Monday, October 24, 2011

iTunes 10: WiFi Sync Your iPad/iPhone


One of the best things about the new iTunes 10 software is that it allows you to do wireless syncing. Finally, gone are the days where you scramble for your little white USB cable just to add a single song to your iPhone.

If you set the option appropriately, you can now sync your iOS device to your computer wirelessly when they're on the same WiFi network! The procedure's pretty simple:

How to set up WiFi Syncing For Your iOS Device
[1] Plug in your iOS device to your computer.

[2] Open iTunes. Click on the device as it appears in the left hand panel. Now, you are presented with what I call the 'Device Management' screen.

[3] At the bottom of the page, you'll see a section called Options. Check the box called Sync with this iPad over WiFi. (You can replace the word iPad with iPhone depending on your device.)

[4] Now, make sure to Apply these new settings by clicking on the bottom right button. If you don't do this, iTunes won't save the changes you just made for your iOS devices. 


[5] Now, unplug your device from iTunes. Congratulations! You have just configured the new settings. Now it's time to test it out! 

[6] Next time you start up iTunes, you'll be able to manage your device without having to plug it in. 

As long as the device is connected to the same Wi Fi network as your computer, the device will appear in your computer's iTunes. 

Devices on the same wireless network appear in iTunes without being manually connected. 

Before, you would have had to plug in the iOS device to see them appear under the Devices section in iTunes. Now, they should appear in iTunes even without being physically connected to your computer. 

[3] Make the changes you'd want in the Device Management screen. Or, if you just automatically sync your whole iTunes library, you don't have to do anything! The only thing you must not forget, is to click on Sync. If you don't click Sync, then it won't sync, and this will all have been for naught. This new iTunes 10 feature is magical, but it's not that magical. 

Personally, I couldn't believe this WiFi syncing; it seemed too good to be true. But, of course, it totally works! On my computer, I designated a new playlist to sync, and after I pressed Sync, the playlist appeared on my iPhone! So awesome!!!!! 

Press Sync in iTunes to watch the magic happen!

Enjoy these fruits of the wireless revolution!

Saturday, October 15, 2011

iOS 5: Notifications Center


Yesterday, I did a lot of trial-and-error-ing Mythbusters style trying to 'fix' my Notifications Center (Really? Apple's new iOS wasn't as annoyingly cumbersome and flawed as I initially thought? Huh. Who'da thunk it? ). All turned out well in the end. For the interested, read on! 


I love Mythbusters (the people and the show). So. Much. (Image from Mattson Creative)


The notifications center was probably the biggest thing that the iOS 5 boasted. People ranted and raved about it in the months preceding the software update. Last night though, I mostly ranted to myself. For some reason (actually, quite a few reasons...all of which will be addressed below), my notifications center wasn't working!

Let me explain.

This is how it was supposed to look.


See that? Updates about your phone, calendar, messages, reminders. All that was missing from my notifications center, and I was so sad! But, a few hours later and after much testing, I figured out what needed to be done to get the notifications center working. I'll explain below.

I'll address the following subjects as they pertain to the notifications center:

  • Mail
  • Calendar
  • Reminders
Mail 

Key finding: The notification center only reflects mail for the mailbox linked to your iCloud account. 

My problem: If you read my earlier post on how to create a separate Apple ID account for your iCloud information, you'll understand how I created a separate .me account just for my iCloud information. Obviously though, I didn't want notifications for this essentially unused .me email account--I wanted notifications for my personal email account! I explain how to do it below:


How to change the primary email account associated with your Apple ID
[2] Go to Manage your account

[3] Log in with the Apple ID that you used to register iCloud.

[4] Underneath Primary Email Address, you will see that the Apple ID email and the primary email address are identical. For some, this may be perfect; if that's the case, I don't think you need to read on. However, for others, this may be the root of your sad & empty notification screen problems. 
If you created a new @me.com account for iCloud,
 you probably don't want email notifications for the almost zero emails you may get there. 
[5] To remedy this, simply choose Edit in the Primary Email Address section, and then type in the email address for which you do want notifications. Then click Save.


[6] You should now see the new personal email listed. 

[7] Choose Save Changes
[8] We're now done with this step. 

And with that, my friends, you should now be receiving notifications for the email you put under Primary Email Address. Simple solution! 

So, what's the lesson here? 
You only receive email notifications for the Primary email address associated with your Apple ID. 

Calendar

How it works: The Notifications Center only shows events on your iCloud calendar. I didn't have a problem with this part of the Notifications Center. 

To learn how to move Google Calendars into iCloud, read my post on how to do it here


The lesson about calendars? 
Only events in your iCloud calendar will appear on your Notifications Screen. 


Sad, blurry image.
Reminders

Key finding: Only reminders with Alerts set for tomorrow or later will appear on today's Notification Screen. 

My problem: I like streamlined, centralized systems. Which means I wanted my daily events calendar and reminders (in addition to my unread email and messages) to appear on my Notifications screen. At first, when I made new reminders, they wouldn't appear on the Notifications screen. Quelle horreur! After much fiddling with reminders, I found a solution. 


First, you should realize there are multiple ways of making reminders--on your Mac in iCal, on your iPad in the Reminders app, and on your iPhone in the Reminders app. I will talk mainly about making reminders in iCal. 

How to make reminders in iCal that will show up on your notifications screen
[1] Open iCal. If you haven't done so already, you'll want to View > Reminders. Now, there should be a column on the far right of your iCal window labelled Reminders

[2] Add a new reminder by either going to File > New Reminder, or if you prefer keyboard shortcuts Command + K. If you want to be really fly, after you press Command + K, type in Command + E so you can edit it easily (like adding an alert!) without doing that annoying right click move. 

[3] Give it the title you would like, and if you are less concerned with the reminders appearing in the notifications center because you plan on opening the Reminders app to check on your To-do lists, then that's all you have to worry about. 

However, if you want your reminders to appear on the Notifications Screen, you'll need to go a bit further. Basically, you need to add an Alert

But then the question becomes, when do I set my alert to allow this reminder to appear on today's notification screen? 

Say that today I wanted to Buy Cinnamon, Flour, and Sugar, and I wanted that reminder to stay on my screen all of today. I would actually have to set the alert for tomorrow if I wanted to have it on my notifications screen.

If you're interested in seeing how I figured that out, it involved a lot of methodical changes to my reminders using my computer, and seeing which ones appeared on my iPhone. When I first approached it, I for some reason took two factors into consideration instead of just one--due date and alert. So I made as many combinations as I felt were possible, and then I went to my iPhone Notification screen. 

Here are all the due date/alert permutations I thought possible. 
I then went to my iPhone to make sure the Reminders from iCal synced to my Reminders app on my iPhone. Yup, they did! 

The reminders successfully appeared on the iPhone. Hooray for iCloud!

Then came the moment of truth. I pulled down my notification screen to see which reminders made the cut. As you'll see, the only one that survived had an alert for tomorrow. The ones with no alert didn't show, and the ones with an alert for today also didn't show up. Also, a notification appears on the day before the alert only. So, for example, if today were Monday, and I set an alert for Friday, it would not appear on my notification screen until Thursday.  


But then, I just realized, that I was doing bad science. In my frantic attempt to rid myself of an 'uncooperative' Notifications / Reminders system, I was working with two factors instead of one. So, just to make sure that it was the alerts setting and not the due date setting that was responsible for my success, I added one more task on my iCal. I added, a reminder with no due date but an alert for tomorrow. And as you can see below, that one flies nicely onto the Notifications screen to. 


So after all this madness, what's the conclusion? 

To get a reminder to appear on today's Notifications Screen, the reminder must have an alert set for tomorrow. 


Notifications appear on the day before the alert is set to appear.

This it the part where a sign saying BUSTED or CONFIRMED would clang to the ground in slow motion if this were a Mythbusters episode. Unfortunately, I'm not a real Mythbuster (only one in heart!), and I didn't really have a myth to bust. 


I hope this post helps others who found themselves similarly banging their heads against the table after thinking the Notifications Center on iOS 5 doesn't work. It does work, it just has a couple of specifications that aren't too obvious at first. Once you do realize what requirements have to be met, then it becomes a piece of cake! 

Hearts, stars, and horseshoes,
Take-a-tech-tip

Friday, October 14, 2011

iCloud: Moving Google Calendars to iCloud

Well, I guess when I mentioned 'near future' in the previous post that 'near future' really meant near near!

Let's return to our familiar format of Q&A.

Q: Can I move calendars from Google to iCloud? 

A: Yes! Yes you can!

Q: Is it easy? 

A: Yes! Yes it is! In fact, it's a million times easier than I expected. It's actually way easier than syncing contacts and revising all of them, and definitely easier and faster than the actual iOS 5 update process!

Q: Okay, what do I need to know? 

A: There're a couple things. Here we go, numbered points style. Hopefully the pics will help you out.

[1] Export all your calendars from Google calendar. Open your Google calendars in your nearest web browser. On the top right corner, click on the Gear symbol. Select Calendar Settings. Click on the Calendars tab.

You will see the following screen. At the bottom of the page, click on Export calendars. What this does is it will make a .zip file containing all of the calendars.


[2] Open iCal. Go to File > New Calendar > iCloud. Give it the name of your choice.  


The calendar will now appear in your Calendars list. 


[3] Open your Finder window. Double click on the .zip file. Doing so will put an uncompressed copy of the folder in the same location. Open this uncompressed folder, and double click on the calendar file (ends with .ics) of your choosing. Even though the name will be long, the calendar name should be there at the beginning of the file name. 


[4] You will receive a 'warning' which you can ignore. Click Open

[5] You will be redirected to iCal, where you will be asked to select which calendar to place this file. Select the iCloud calendar you recently made. Click on OK


[6] That's it! Now you're done. The Google calendar has been successfully imported into the iCloud. These events will appear on any iOS 5 device that is syncing calendars using iCloud. If you want to check that everything is in order, visit www.icloud.com. Only calendars that were successfully uploaded to iCloud will appear in the browser. 

Of note, to make life easier, you will probably want to the iCloud calendars your default. To do this, go to iCal > Preferences. Change the Default Calendar as desired. 


To read Google's original directions for the procedure, click here. 


iPhone: iOS 5 and iCloud


The much iOS 5 has finally arrived. I've recently synced my iPhone and iPad, and here are some initial findings. Here, I do an informal Q&A with myself from a few hours prior, with the hopes of helping others who may have similar questions.

Q: How long does backing up take? 


A: It depends. I had to update to the newest iTunes version, and that required at least 15 minutes. Then, iTunes will most likely begin syncing your iPhone to your library. Don't bother. Click on the little 'x' at the top of your iTunes window where you regularly read those status updates such as 'Step 1: Blah blah you don't really care it just means you can't unplug your iPhone'. Once you click on your iPhone's name in the left menu bar, choose Update.

The update will begin to download, and this will probably take another 20 minutes at least. Once it's downloaded, you are ready to install. But wait! Make sure to do two things--create a backup and transfer your purchases. I tend to err on the side of caution.

After backing up (this probably takes another 20 minutes), you can install your update! Installing takes a long time--at least 20 minutes. iTunes backs up your iPhone for you (again, I think), and does some fancy business.

Q: What is iCloud? 


A: Glad you asked! iCloud is supposed to remedy everything that has gone kind of crazy with the many electronics per person trend. Music downloaded on your computer via iTunes? With iCloud, you don't have to worry about syncing with the dreaded USB cable, you can download it directly to your iPhone or iPad! True, the catch is you need WiFi to do any of this, but hey, life without WiFi rarely happens nowadays. Centralizing your music, calendar, contacts, and more? Sounds great, right? It is!

Q: How do I get iCloud? 

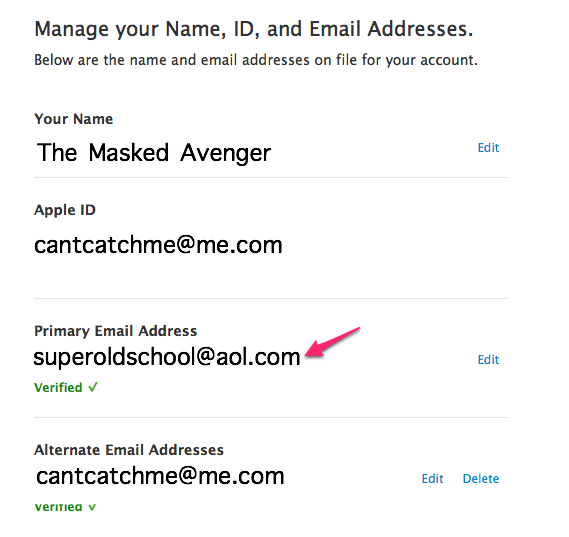
A: iCloud collects all the data mentioned earlier (contacts, calendars, etc) under one Apple ID.

Q: Wait a minute, what if I share an Apple ID account with my family? Is it possible for us to share our iTunes purchases but not our contacts, calendars, etc? 


A: Why, yes! Yes there is! To put things simply, you can have two Apple IDs--one for your iTunes purchases, and one for your contacts/calendars/etc (Apple's official directions are here).

When you install the new iOS, you will be asked to log in with either your current Apple ID or to make a new one. For those are interested in having 2 Apple IDs, you will want to create a new Apple ID at this point. This new Apple ID you're creating will be your Contacts/Calendar/Etc Apple ID. Make sure to do this step because it will become very important soon.

Now, this is an important point I'm about to make. When you've installed your new software, it'll ask you to log into iCloud. Log in with your contacts/calendar/etc Apple ID, not your iTunes purchases Apple ID.

This is the only special point. Everything else in the installation process is pretty self explanatory.

After you've installed everything, you'll now want to set up your iTunes store account with your iTunes purchases Apple ID. To do this, go to

Settings > Store on your iPhone.

From here, type in the iTunes Purchases Apple ID at the bottom of the screen. And voila! Now you can enjoy the personalized benefits of iCloud while sharing your iTunes account with family members!

Q: What is the best part of iCloud?

A: Right now, since I am not using iCloud for email but mainly for contacts synchronization, I'd have to say SYNCING CONTACTS IS AMAZING. Let me explain.

[1] Contacts are ridiculously important. If I lost my phone, goodness gracious I don't know what I would do.

[2] Also, my way of logging contacts has been pretty inefficient over the last few years. There are multiple entries per person (reminders of my Nokia phone past--I had contacts like Mom home, Mom cell, and Mom office).

[3] I also never found a good way to sync contacts.  I dabbled with Google to sync contacts, but I still sometimes ended up with annoying duplicates. There was never an issue of contacts getting lost or accidentally deleted, but the system was far from efficient. And, mind you, I thrive on efficiency and streamlined systems.

[4] I hate typing extended amounts of things on touch screens. So really, I didn't have the patience or accessory eye muscle power to slowly go through my iPhone contacts one by one on that tiny (lovable) little screen.

And there is where iCloud has really stood out for me. Among all the updates about Reminders, Notification Centers, and iMessages, the only thing that really is life-changing for me is this iCloud Contacts Sync.

I will continue to explain.

[1] Once you agree to sync your contacts with your iCloud account, your contacts are all in one place. You will be reminded that iCloud and GoogleSync cannot coexist (for those who also use GoogleSync), and that's just fine.

(Side note: For Mac users, I highly recommend backing up your Address book anyway. I did, although I never ended up needing it throughout this process. Open Address Book. Go to File > Export > Address Book Archive) 


[2] Once you've installed iCloud on your iPhone and Mac, you can now edit everything on your Mac. Do you know what this means? You can use you keyboard and a mouse. God, I went a little overboard and actually cleaned out my entire Address Book from A to Z. And now it's perfect! One card for each person or company with organized labelled numbers and emails. I love it.

[3] When you edit contacts using Address Book on your Mac, you can customize the title associated with the phone number. Normally, titles are 'home', 'work', 'mobile', etc. Well, did you know you can select 'custom' and type in your own? This becomes handy because I like to have one contact for a store, like Macy's for example, and then list all the various locations underneath. I will illustrate it for you below:

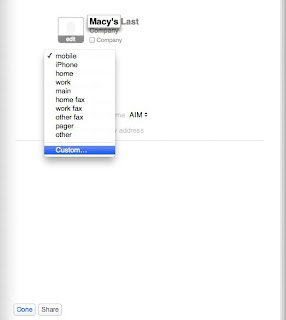
Select Custom under the telephone field title. 

Voila! Tres magnifique. 

During my mass clean of my contacts (for quicker Contact Card deleting, select the card name and press Delete), I also found some 'bugs' that were a little annoying at first. When you delete and edit a bunch of contacts, they may appear as 'No name' in your address book even after you continue editing. To solve this, make sure to press Done at the bottom of the card. Once you do this, those annoying shells of a contact card will disappear. I provide images below:

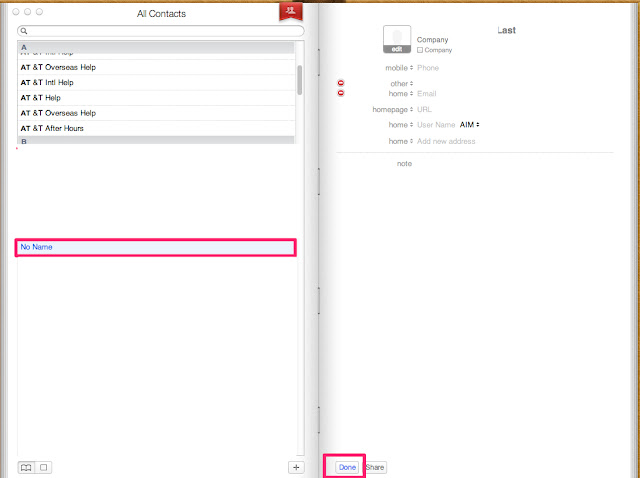
Once you click on Done, the No Name will disappear. 

A final issue of note that came up during this process--a  lot of my apps disappeared off my iPhone after the update. There were two options to remedying this--going to the App Store and redownloading all my purchased apps or syncing my apps from my computer. Going to the App Store and using the iCloud is not as easy as one would think. Each time you download an app from the iCloud, you are redirected to the home screen. Then you have to flip back to the App Store to download another app, at which point you are returned to the home screen. It's like running in virtual circles. No fun. So after three stubborn attempts to continue this, I decided on just syncing from my computer. When you look at your iPhone Management Screen (that's what I'm calling the page you see in iTunes), you choose to Sync All Apps.

Yes, the Apps return to your phone. However, they don't return to the pretty folders they were in before. This may be my fault, as I'm not very experienced in backing up (read: I'm lazy).

And that's basically it! I hope this helps whoever's interested in taking advantage of the new iOS 5.

If I have time in the future, I may address Calendars and whether it's worthwhile to jump from Google Calendars to iCloud's calendar, and how to go about doing it.

Until then, rock on, Mac users!


Sunday, September 4, 2011

iPhone: Google Contacts Sync and Removing Duplicate Contacts

For those who are interested in syncing your Google Contacts onto your iPhone, I highly recommend it! The process is simple.

Syncing Google Contacts
[1] Sync your Address Book.

  • Open Address Book.
  • Click on Address Book > Preferences
  • Click the checkbox for Sychronizing with Google
  • Enter your username and password.


[2] Add a Google Account to your iPhone
  • Go to Settings > Mail Contacts Calendars > Add Account...
  • Select Gmail
  • Enter the appropriate username and password.
  • Set the sync options as appropriate: Mail, Contacts, Calendars will all be things you'll likely want On
  • When you turn Contacts On, it will ask you what to do with your phone's current contacts. When it asks to delete the phone's local contacts, you should agree to this step PROVIDED that all your contacts information is on Google's server.
Now, your iPhone should contain all your Google contacts. 

A related but different issue involves having duplicate contacts on your phone. I had this for a while, and it was pretty annoying. My profile pictures for various contacts were changed, but not really (depending on which of the two contacts I had altered), and the custom ringtone assignments sometimes worked. 

For those with similar problems, the solution is easy. 

Removing Duplicate Contacts on the iPhone
[1] Go to Settings > Mail Contacts Calendars 
[2] Select your Gmail account. 
[3] Go to Contacts and turn it Off. When it warns you of the contacts' deletions, accept the action. 
[4] Now go back and turn Contacts On. When it asks you what to do with the local contacts, choose the actions that will delete them. 

Now, your duplicates should be gone! And the world was right again. 

Thanks to ElectroDisco who posted on this Google Forum thread with the above answer. 
For those who are interested, Google's official documentation on the matter is here


Google's official documentation about contact syncing can be found here. 

iPhone: Making Your Own Ringtones


Have an iPhone? Like custom ringtones? Especially ones that are free? If you answered yes to all three, read on, my friends!

After reading some articles about ringtone making (see this article and this one from MacLife), I decided to try it out myself.

The procedure involves a few easy steps:
[1] Download the free app from the App Store. Click here to read about it on Apple's website.
[2] Have unprotected mp3s on your iPhone
[3] Follow the instructions provided for you in the App.
[4] Get the files onto your computer (I recommend sending it rather than sharing files via iTunes because it's easier, I think.) Watch the video to see how to do file shares.
[5] Add the files to your iTunes library, and then sync the Ringtones to your iPhone.

The App makers have a really excellent video with clear step-by-step screenshots. I highly recommend it. You can watch it here:


The longest and most tedious part of this whole procedure is the iPhone Sync process, but for the million ringtones I'm going to make, I don't mind!

I had Gmail screen the files for virus (I'm a little paranoid), and these files got the green light. I followed the video's guide, and now I have myself a nice little collection of ringtones.

If you're interested, there's a 99 cents version of this app, which allows for some customizable features such as speeding up or slowing down the mp3 (as mentioned in one of the MacLife articles). For most, that will probably not be necessary, and the free version is just fine.

Sunday, August 21, 2011

App store: Evernote and Wunderlist

In case you haven't discovered these, Evernote and Wunderlist are two great apps in the App Store that allows you to sychronize data between all your iOS and OS devices. Even better, they're free! I often use them for Shopping lists, Recipes, and To-do lists.


Evernote
Click here for a description.

Notable features: 
Tagging
Synchronizing over multiple devices
Web access to notes, free
Now accessible on Macs and PCs!
Web clipping feature


Wunderlist
Click here for a description.

Notable features:
-Simple design
-Easy-to-use keyboard shortcuts
-Web access to lists (no download necessary)
-Free
-Really snazzy webpage (okay, this isn't really that important a plus in terms of functionality. But being easy on the eyes is always a plus!)

Wednesday, July 27, 2011

Spotify: Searching Spotify's Music Library

Spotify is awesome (read a previous post about it here). Here's some tips on searching in Spotify.

Unlike iTunes and Zune, Spotify boasts no main screen welcoming users into a nicely organized musical world. iTunes and Zune have links for specific genre types, but Spotify does not. In terms of organization, the one common aspect of all three is a Top Tracks/Top Albums list.

iTunes allows easy genre browsing. Spotify does too, but in a slightly different manner.
In iTunes, click on Music and then All Categories on the upper right panel to view various genres. 


To help you get around Spotify's music library, I've written some instructions below. Read on if you're interested. Of note, I have a Mac so my images may be slightly different (but probably not significantly so) than Windows users.

If anything in the screenshot thumbnails is not easily visible, you can always click on an image to reveal a larger version of itself.

First, let's get familiar with Spotify's browsing screen. 
[1] Open Spotify

[2] On the far left panel, click on What's New. You should be met with a page showing the New Releases. At the bottom of the page, you will also see Spotify's Feed featuring articles/playlists/news posted by Spotify's Team.

Clicking on [A] What's New in the left panel brings you to the [B] What's New tab.
You will be able to see [C] New Releases and [D] a News Feed.

[3] If you click on the Top Lists tab, you will be brought to a page showing you Top Tracks and Top Albums.

Click on the [A] What's New link on the left panel.
Click on the [B] Top Lists tab.
On the left half, you will see a list featuring the top Tracks [C1] in the United States [C2].
On the right half, you will see a list featuring the Top Albums [D1] in the United States [D2]
However, this page is very customizable. Basically, this page can hold a total of two lists, which you can set to have any combination of the following:

  • Tracks/Albums/Artists option
  • Everywhere/In the U.S./For Me/In Another Area (U.K., Finland, France, etc.) option


[4] To customize your lists, simply click on the arrow to the left of the option title, and a drop down menu should appear. Click on the option you want, and your new list should appear.


Click on the little arrow next to Tracks to change the option.


Click on the little arrow next to in the United States to change the option.

Making a Top Tracks For Me list is analogous to arranging your songs in iTunes by Number of Plays.
You can easily access your top tracks by setting it to Tracks & For Me

Next, let's learn how to optimize searching. 
When most people use a Search toolbar, they tend to type only the keywords they're interested in. However, with a few simple text commands, you can specifically search certain genres, artists, and time periods! Read on for more.

To search for a specific genre
[1] Click in the Search Toolbar.
At the top left of your Spotify Window, you should see a Search Toolbar.
[2] To search a specific genre, type in the following: genre:"_________" and then press Enter to search.
It is very important that you put quotation marks around the Genre (this is especially true for two word genre titles. If you do not use the quotation marks, the search will not work). Additionally, make sure you do not add any spaces before or after the colon--doing so will result in an unsuccessful search.

For a list of available genres, click here. This is a Google Document of searchable genres posted by Spotify originally in March 2009. I'm not sure how recently it is updated, but I've tried a couple of the more obscure ones and they seem to work fine.

After searching, a list of artists and albums will appear in the upper pannel, and a list of tracks will appear in the lower panel. The titles in the Artists and Albums sections are links, which you can click to be redirected to appropriate artist/album page.

Type in genre:"_______" with special attention to the quotation marks in the Search Toolbar. You should see a list of relevant [B] Artists, [C] Albums, and Tracks.. 

Failure to use quotation marks with multi-word genres leads to an unsuccessful search.


To search for a specific artist
[1] In the search bar, type in the following: artist:"_________" (Again, make sure you do not add any spaces before or after the colon--doing so will result in an unsuccessful search.)
Hit enter. A list of artists should appear.


To search for music from a particular year/within a particular time frame
Now, here's a really cool trick. You can limit your search to a particular year/year interval. To do so, simply add a space and the following text to the end of your genre or artist search: year:1999 or year:1990-1993

Regardless of whether or not you are searching a single year or multiple years, the format is the same, it must be year:#####. If you make it years (plural), it will not work. Also, make sure you do not add any spaces before or after the colon--doing so will result in an unsuccessful search.

Here are some examples. Say I was searching for Backstreet Boys. I would search artist:"Backstreet Boys"


Search artist:"Backstreet Boys" in the Search Toolbar [A] for some major BSB love.
You can see what search terms you used here in [B]. 

But say I didn't want to listen to their new 'comeback' music (ouch, right?), and I wanted some solid BSB hits. I wanted music from their golden years, specifically 1997-2000. I would then search
artist:"Backstreet Boys" year:1997-2000

Adding year:##### gets me to the Golden Age of my BSB music search.

And that ends my tutorial on how to search in Spotify. All this information was originally found in this Spotify post, but I fleshed it out a little. Hopefully it has been to your liking.

Look forward to more Spotify posts on such topics as:

  • Making playlists
  • Sharing Spotify with others without using Facebook contacts

Friday, July 22, 2011

Spotify: It's as awesome as you think it is


For those who aren't familiar, Spotify is a recent addition to the U.S. music playing/sharing/sampling world. As an online music subscription service, it's not the first of its kind. Napster, Zune, and Rhapsody are examples of others--however, none of these have made any real waves.

Spotify comes in three varieties--the free version of Spotify ($0/mo), Spotify Unlimited ($5/mo), and Spotify Premium ($10/mo). Spotify Free allows for we

If you're interested in sampling Spotify at no cost, you'll have to add your name to the (no one really knows how) long list by adding your email here. I don't know how long your wait will be, but maybe this fact will help you with the estimates. I added myself to the list about 1-2 days ago, and today I received an email today notifying me that I could gain access to the free version of Spotify.

Before I go into some more details about how Spotify works, let me explain why I think Spotify could really hit it big here in the States. Never mind the raves posted by people such as Mark Zuckberg of Facebook fame (you bet they're going to have some kind of agreement between the two companies). Never mind its already established reputation in Europe. After being a loyal and mostly pleased Zune subscriber for two years, I have to say Spotify really has this music subscription service down.

And so, I've summarized the preliminary pros and cons of Spotify. Read on if you're interested.

How Spotify Accomplishes What Zune Probably Wishes It Could Have
[1] Spotify is cheaper! (Before delving any deeper, all these comparisons will be between Zune and Spotify Premium; let's make the assumption you want to have a music subscription service and the ability to make your music portable.)

Looking at the monthly fees, Spotify is cheaper. Zune is $15/mo whereas Spotify Premium is $10/mo. Zune requires you to purchase a Zune player (which run for at least 100 bucks), but Spotify can be used on most mobile phones (including the ever popular iPhone).

The only caveat about this is how many individuals can share one Spotify account, which thus changes our considerations for cost. This will be an issue addressed later.

[2] Spotify boasts cable-free syncing between the computer and iPhone (let's continue using this for the rest of this exercise). As much as I loved Zune and its expansive online library, there were moments when Zune really got to me. The Zune player has to be connected with the computer at least once a month otherwise the digital rights for the music files expire. Nothing sucks more than being on a long public transit ride and discovering that all your music can't play. Also, syncing was sometimes temperamental. Sometimes the playlists quickly and rightly jumped from my computer to the player, and sometimes they did not even though I executed the appropriate computer commands.

Spotify syncing is a million times easier. There's no cable required. All you need is a Wi-Fi network that both the computer and iPhone are connected to. Playlists automatically sync--you don't have to do anything. You don't have to select a Sync button or anything. It's fantastic.

[3] Spotify has a larger music library! There were a couple of albums that I would have liked to listen to on Zune (Nickel Creek's albums and Chris Thile's albums, for example) that weren't available. First thing I did after getting Spotify was searching these very same albums--and lo and behold, they were there! Spotify has a greater audience and has demonstrated its wide reach (whereas Microsoft's Zune has always had a lukewarm reception from the public), and artists and music companies are more willing to pay the fees required to make their music available on Spotify.

However, no music subscription service is perfect, and even Spotify has some weak points.

Points where Spotify is Lacking
[1] Spotify lacks a nice comprehensive Home Screen in the Spotify equivalent of the iTunes Store. Both iTunes and Zune had a page showing new releases (Spotify has this), and many different menus for genre browsing (Spotify doesn't have this). iTunes and Zune both had a Top Downloads list, but Zune's was basically defunct because of its relatively small audience. I found that whoever downloaded a CD that day basically determined what appeared on my Top 10 Zune Downloads list because all the songs tended to be from the same CD. Helpful, right?

For this reason, I think keeping iTunes around to browse new music and new releases is a good idea. I'd make a quick trip into iTunes, see what was interesting on the home page, and then use that information as a starting point for browsing in Spotify.

[2] As with any music subscription service (or music store in general), you have to be pretty proactive in terms of your music explorations. As wide as Spotify's library may be, the user still has to have the motivation to discover new music and the discretion to elect what goes into new playlists.

If this doesn't sound to your liking, you may want to adopt my strategy. Find a radio station you enjoy listening to (ALICE 97.3 FM is my favorite!)--maybe even listen to it on your iPhone. Find songs you like hearing at frequency greater than that provided by the radio, and get them on Spotify.

[3] Spotify does not allow you to purchase songs. This is very different from the Zune subscription service, which for $15/mo gave full access to download songs as you pleased (these were not owned but simply downloaded to your computer with time-limited digital rights) and then 10 song credits for mp3 ownership.

For me, this is not such a big deal. When I used Zune, it was usually difficult for me to come up with 10 songs a month to download, so losing this ability is not too troubling in my opinion. However, for people such as my sister, music ownership is everything! She likes to listen to a small selection of songs, and thus values music ownership higher. I'm more exploratory and like to go wherever my clicks take me, so I value the wide library selection more than owning individual songs. Depending on your personality, you will have a specific take on the music subscription versus ownership debate.

Expect more Spotify posts in the future! Topics to be addressed include:
-How do I optimize searching in Spotify? 
-What does offline syncing mean?
-How many devices can I have on one Spotify account?
-How does music sharing in Spotify work?


Thursday, July 21, 2011

Mac OS X Lion: Fix for Webpage Swipe Shortcuts

Yay! The day has come! Mac OS X Lion is released! Pluses include Misson Control and Launchpad, which  looks a lot like the iOS devices home screens. But I'm not posting to boast about these features, which you can read about on Apple's site. Click here for some pretty pictures giving a nice overview, and click here for specifics on the 250+ new changes.

The one thing I noticed when I first started interacting with the new OS was the scrolling was weird. The two fingers up/down swipe seemed funny. Previously, swiping two fingers downward would scroll the page down. However, in the new Lion, swiping two fingers downward scrolls the page up. After a little thinking though, I can see what Apple was trying to do. I believe they wanted to set up a more universal scroll up/down action for all their devices--Macbooks, iPhones, and iPads.

On an iPad, users drag the page to reveal what they'd like. On an iPad, you would 'pull' the page upward by swiping your fingers upward to see what was further down on the page. You would use a similar motion on your iPhone. Now, the very same action is used to control your Desktop file viewing experience.

When you think about it that way, the 'reverse' scrolling seems to be a little more logical. However, the same scrolling rules apply for external mice--and I feel this change will take a little longer to get used to. Prior, I would scroll downward to go down the page, but now I have to move the scroll button on my mouse in the opposite direction. Too weird.

The next thing I noticed, was I couldn't use the finger shortcuts to move backward and forward when I was in my browser (Google Chrome!). After reading a little bit online, I found the answer. If you're interesting in restoring this nice little trick, read on.

[1] Open System Preferences. 
[2] Click on Trackpad. 
[3] Click on More Gestures. Change the settings to be as indicated in the image below. I recommend that you change all of them because you will find (if you experiment) that certain settings depend on the settings for others.


After you do this, you should regain your ability to use a three finger left/right swipe to move between pages on your browser.

Wednesday, July 13, 2011

iTunes: Importing Individual Songs Into Library

Recently, I discovered a fast and easy way to import individual songs from CDs into your Music Library in iTunes. Prior to this discovery, I used to slowly uncheck every single box adjacent to the song names until only the desired files remained. This turns out to be inefficient and boring. The easy solution? Use the 'Add to library' feature. If you want to avoid checking those annoying little boxes, read on!

[1] Open iTunes. Insert the CD.

[2] Click on the CD as it appears in the left hand frame. Go to File > Add to Library, or use the shortcut Command + O. 


[3] A new window will open up. Select the CD as it appears in the far left frame. Here, you can either select one song only, or you can select multiple songs. Select multiple consecutive songs by clicking on Song #1 (for example) then pressing Shift and clicking on Song #5 (for example). To select multiple nonconsecutive songs, click on Song #1 (for example) then press Command and click on Song #8 (for example).

After you've made your selection, select Choose.

In the new window, make your song selection and then click Choose

[4] The songs will begin to be imported. You can recognize this because a little orange squiggly icon will appear adjacent to the imported song. When the import is complete, the icon becomes a green circle with a checkmark inside. 
During the import, an orange icon is present.


After the import is complete, a green icon is present. 

[5] You will find the new songs in your Music Library in iTunes. 

The song is now imported in your library.

Ta-daa! Now you know a trick or two about importing individual songs without going through the hassle of a dozen or more clicks.