1) Allow for email subscription for interested audience members
2) Create automated tweets announcing new posts
3) Establish an RSS feed that people can subscribe to
If those sound like things you're interested in, read on for some detailled how-to's!
[0] Set up a blog
First, make a blog. My guide will be for Blogger-based sites, but I imagine you can tweak things minorly for other blogs such as Wordpress, etc.
Go to www.blogger.com and 'create new account'.
[1] Create a feed
In order to set up email notifications and twitter updates, you need a feed.
Go to feedburner.google.com. Log in with the Google username and password associated with your blog.
You should see the following screen:
Initially, you will have no feed names appearing under feed title. In order to establish your feed, type in your blog website name into the line for your blog or feed address, and then click Next. For example, you would type in:
http://username.blogspot.com
You will next see the following window. Select the Testing-atom radio button. Click Next.
You will now see the following window:
You can change your Feed Title to what you would like, and you can also change your feed address. Initially, it may look like: blogspot/wHidE , but you can change the last portion to something else so it could appear as blogspot/yourtitlehere.
Click Next. You will see the following screen:
Voila! You have established a feed address. Click Skip directly to feed management.
[2] Establish email subscriptions:
By setting up this subscription service, viewers will be able to receive daily email updates provided that you have updated your site on that particular day. All subscriptions will be sent from noreply@blogger.com. You don't have to worry about inadvertently sharing your personal email.
After you've established your feed, you will see your blog represented on your feedburner.google.com site.
[2A] Turning on email subscription features
Under the 'Publicize' tab, you'll click on the 'Email subscriptions' heading. Click on Activate.
You will now be directed to the Subscription management subheading. The window will look as follows:
It is on this page that you will be able to 'View subscriber details'. You can see the emails of your subscribers, and you will be able to deactivate or delete these emails as desired. Currently, since you have just established your subscriptions, you will not have any subscribers listed at the bottom of the page.
[2B] Personalizing your message to subscribers
If you'd like to customize your 'thank you for subscribing message' (I did!), click on the Communication Preferences under the Email Subscriptions heading in the Publicize tab. You will see the following screen:
In this window, you can change the Confirmation Email Subject (the subject of the email sent to new subscribers) and Confirmation Email Body (the message that will be sent to new subscribers).
On this page, you will also be able to change the email 'from' address. By default, feedburner puts in your personal email. If you'd like, you can change it to noreply@blogger.com.
After making your changes, click Save.
[2C] Set up a subscription email delivery time
In the Publicize tab, under the Email subscriptions heading, you will find the Delivery Options subheading. Here, you will be able to set the time that subscribers receive an email notifying them about the changes in your site.
[2D] Add the email subscription widget to your blog.
Think of widgets as little gadgets on your site that are pre-made for you and your users. Google provides many different widgets for its bloggers. To access this widget, do the following:
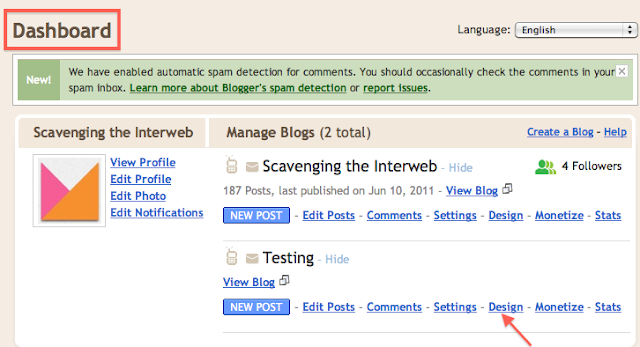
Go to www.blogger.com. Log in. You will be sent to the Dashboard, which is basically the control room for your site. Here, you can change the visual aspects, add widgets, make new posts, etc. Click on the Design link.
 |
| Your dashboard (actually, mine in this case). |
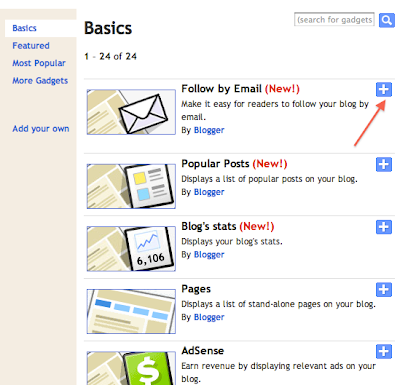
After clicking on Design, you will see the following. Click on the Add a Gadget link. You will see the following window pop up.
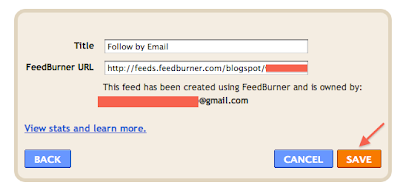
Adjacent to the Follow by Email gadget description, there is a + button. Click on it. If you wish, you may change the name of the email gadget. Finally, click Save.
 |
| After clicking on 'Add a gadget,' you'll see this window. |
 |
| After deciding upon your gadget title, click on 'save.' |
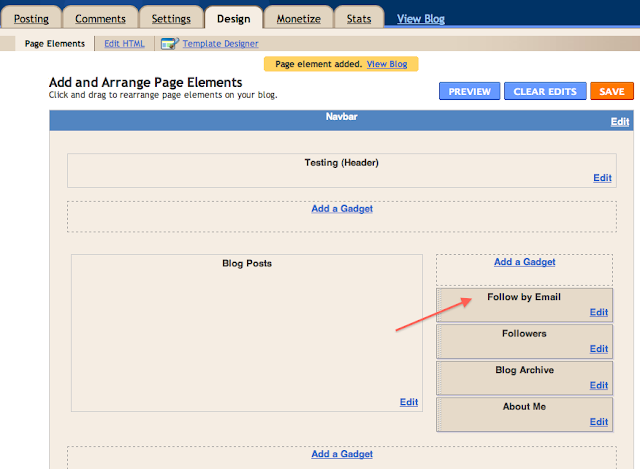
You should now see the Email gadget appear on your Dashboard's Design page.
 |
| Ta-da! The Follow By Email gadget is now officially a part of your blog. |
[3] Announce new posts through automated twitter updates.
Go to feedburner.google.com.
Log in if you aren't logged in already.
Under the Publicize tab, select the Socialize heading.
Click on the Add a twitter account button, and enter the appropriate information.
You can also make each automated tweet start with a phrase of your choosing, such as 'New post!' Type the desired phrase in the Additional text box.
Below is an example of what posts with Additional text look like:
At the bottom of the page, click on Activate.
In order to finalize the connection between Blogger and Twitter, you will need to approve this action via the Twitter site. After entering your twitter information, you will be presented with a link that will give you the screen depicted below. Click on Authorize App.
To confirm that the approval has occurred, you can go to www.twitter.com and log into your account. On the top hand corner of your window, click on the little arrow to the right of your username, and select Settings.
In the settings page, click on the Applications tab. You should see that Google by Google, Inc. appears in the list. Its presence means the connection between your twitter and blogger accounts was successful. If at any time you decide to halt the Blogger updates via twitter, simply click on Revoke Access.
The final step involves activating PingShot, a feedburner service that ensures the most frequent communication between your blog and twitter account. PingShot will keep your update tweets as recent as possible.
Back at feedburner.google.com, under the Publicize tab, click on the PingShot heading. Click on Activate.
Note: If you ever feel that the feed is not updating as often as you'd like. Simply visit:
Type in your site name, and then click Ping Feedburner. After you've clicked the button, bookmark this new page; any time you want to re-sync your feed, simply click on this bookmark. The URL for the bookmark should look something like this:
http://feedburner.google.com/fb/a/pingSubmit?bloglink=http%RandomNumbers%yourwebsite.com
Now, you're all set. You have just successfully navigated the choppy how-to-integrate-social-media waters. Congratulations!


No comments:
Post a Comment